- 07 Mar, 2026
Garlic for Beginners: Plant in Fall, Harvest with a Smile
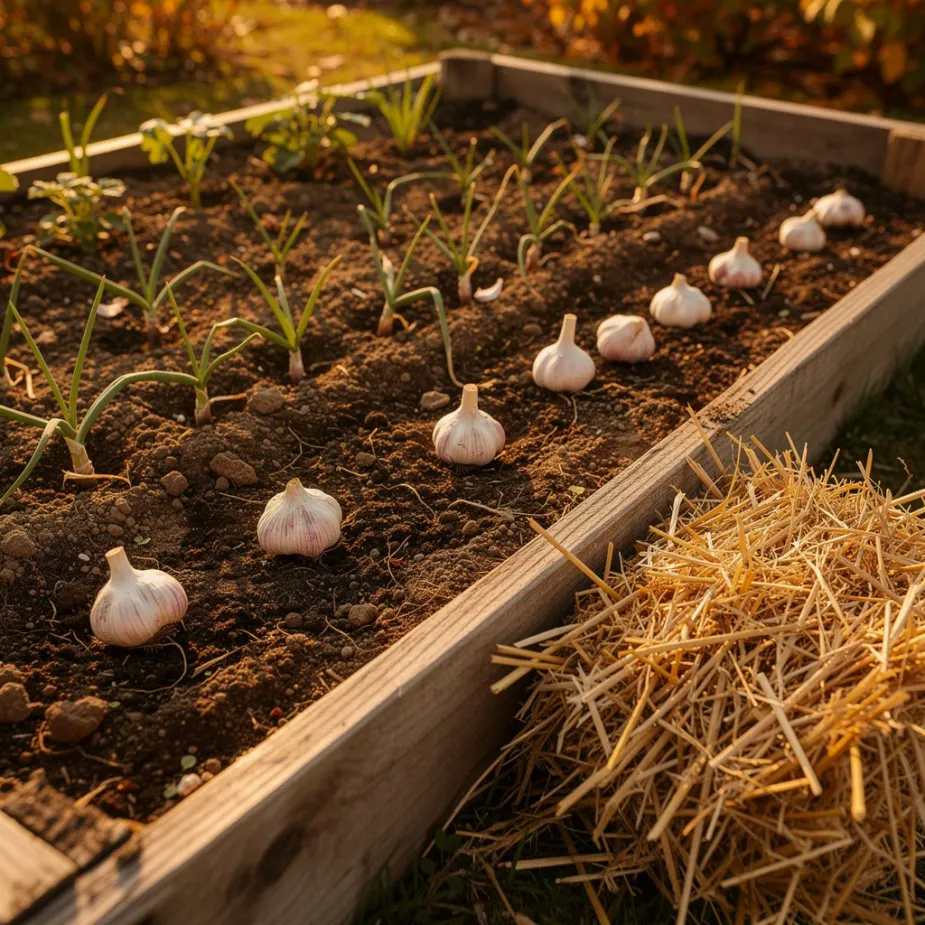
Garlic is one of those crops that makes me feel smarter than I am. You tuck cloves in the ground in fall, mostly forget about them through winter, and then pull up beautiful bulbs in summer like some kind of garden magician. If you are new to garlic, start simple. It is one of the most forgiving crops I grow. Why Garlic Is Worth GrowingUses very little space Needs less day-to-day fuss than many vegetables Stores well for months when cured properly Gives you both bulbs and optional garlic scapes (if you grow hardneck types)I started with one short row years ago because my knees were acting up and I needed a low-maintenance win. It became a yearly habit. Hardneck vs Softneck HardneckBetter flavor complexity for many cooks Produces edible scapes Often does best in colder climates Usually fewer, larger clovesSoftneckLonger storage life in many conditions No scapes Often more cloves per bulb Common in warmer regions and grocery storesIf you are unsure, ask a local grower or extension office what performs best in your area. When to Plant Garlic Garlic is usually planted in fall, about 4-6 weeks before the ground freezes hard. That timing lets roots establish before deep winter, then growth takes off in spring. For planning windows, pair this with Fall Vegetable Gardening: What to Plant and When. How to Plant Garlic (The Easy Version)Choose healthy seed garlic, not supermarket garlic Separate bulbs into cloves right before planting Plant cloves pointed end up, 2 inches deep Space 4-6 inches apart in rows about 8-12 inches apart Water in well Mulch with 3-4 inches of straw or shredded leavesDo not peel the cloves. Keep the papery wrapper on. Spring Care Once growth begins in spring:Pull weeds early so garlic is not competing Keep moisture steady, especially during bulbing Side-dress lightly with compost in early spring Remove hardneck scapes when they curl (great for pesto)If watering routines are a struggle, this guide helps: How to Water a Vegetable Garden the Right Way. When to Harvest Garlic is usually ready when lower leaves brown but upper leaves are still partly green. A common rule:Harvest when about one-third to one-half of leaves have dried downIf you wait too long, wrappers split and storage quality drops. Curing and Storage After harvest:Brush off loose soil (do not wash bulbs) Cure in a dry, airy, shaded place for 2-3 weeks Trim roots and tops after curing Store in a cool, dry spot with airflowAvoid sealed containers. Garlic likes to breathe. Common Beginner MistakesPlanting grocery garlic that may be treated or poorly adapted Planting too late in fall Overwatering in heavy soils Skipping mulch before winter Waiting too long to harvestMy Gentle Nudge If you only try one new crop this year, make it garlic. Truly. Plant one small bed this fall and let future-you enjoy that first homegrown bulb in summer. That little success feels wonderful. Related ReadingFall Vegetable Gardening: What to Plant and When Mulching for Healthier Garden Beds: A Practical Guide How to Water a Vegetable Garden the Right Way
- 05 Mar, 2026
Fall Vegetable Gardening: What to Plant and When
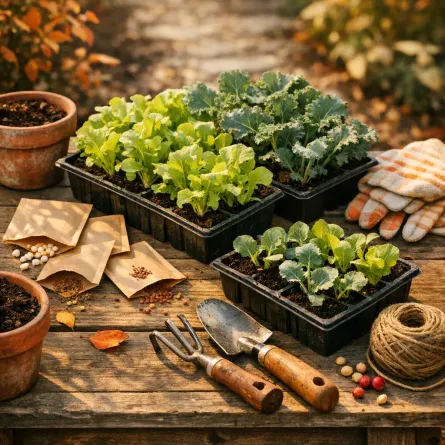
Many gardeners treat summer like the finish line, but some of my favorite harvests come in fall. Cooler temperatures ease the pest pressure, and plenty of crops taste sweeter after chilly nights. With smart timing, you can keep harvesting well into autumn and, in some climates, even through winter. Why Fall Gardening Works So Well Cool-season crops thrive when days are mild and nights are cool. In many regions, fall weather is more stable than spring, which means fewer temperature swings and less stress on young plants. Other advantages:Fewer weeds than spring planting Slower bolting in leafy greens Better flavor in carrots, kale, and brassicas after light frost Productive use of beds after summer crops finishStart With Your First Fall Frost Date Your first expected fall frost date is the anchor for all planning.Look up your average first frost date Count backward based on each crop's days to maturity Add 1-2 extra weeks because shorter days slow growthThis gives you a practical sowing window instead of guesswork. Reliable Fall Crops Fast Growers (Great for late starts)Radishes Arugula Baby spinach Mustard greens Turnips (for greens and roots)Mid-Season CropsBeets Carrots Swiss chard Lettuce mixes Bush peas in mild climatesFrost-Tolerant StandoutsKale Collards Cabbage Broccoli (transplants) Brussels sprouts (transplants)Use transplants for longer-season brassicas if your fall window is short. A Simple Fall Planting Timeline Use this as a framework and adjust to your climate.12-14 weeks before first frost: start broccoli, cabbage, and kale transplants 10-12 weeks before first frost: sow carrots, beets, and chard 8-10 weeks before first frost: sow lettuce, spinach, and turnips 6-8 weeks before first frost: sow radishes and arugulaSuccession planting every 10-14 days keeps harvests coming. Preparing Beds After Summer Crops When tomatoes, cucumbers, or beans decline, reset beds quickly:Remove spent plants and diseased debris Add compost to replace nutrients Loosen topsoil and level the bed Irrigate before sowing for even germination Mulch after seedlings are establishedThis fast turnover keeps late-season momentum. Managing Heat During Fall Starts In many places, fall planting begins while days are still hot.Water seed rows consistently to prevent crusting Use shade cloth during intense afternoon sun Sow in the evening and keep surface moisture steady Choose heat-tolerant lettuce varieties for early roundsOnce temperatures drop, growth becomes easier to manage. Light Frost Protection That Extends Harvest Simple protection can add weeks or months of production.Floating row cover: protects from light frost and wind Low tunnels: create a warmer microclimate Cold frames: ideal for greens in late fall and winter Mulch around roots: buffers soil temperatureInstall supports before bad weather arrives so protection is quick when forecasts change. Common Fall Gardening Mistakes Planting Too Late The biggest issue is missing the maturity window. Count backward early and plant on time. Forgetting Day-Length Slowdown Crops that mature in 45 days in spring may need longer in fall. Add buffer time. Not Rebuilding Soil Between Seasons Beds exhausted from summer need compost and moisture before replanting. Growing Only One Round Succession sowings create steady harvests instead of one short flush. Final Takeaway Fall gardening rewards planning more than luck. Start with frost dates, choose dependable cool-season crops, and protect plants when temperatures dip. With a little structure, your garden can stay productive long after summer beds fade. If spring is about beginnings, fall is about finishing strong. Start with one sowing this week and build from there. Related ReadingSpring Garden Planning: Getting Ready for the Growing Season Mulching for Healthier Garden Beds: A Practical Guide Root Vegetables for Beginners: Carrots, Beets, Radishes, and Turnips

- 20 Feb, 2026
Mulching for Healthier Garden Beds: A Practical Guide
If compost is garden gold, mulch is the cozy blanket that keeps your soil steady and productive. A well-mulched bed needs less watering, grows fewer weeds, and handles weather swings much better. The best part is that mulching is simple once you know a few practical rules. Why Mulch Matters Mulch is any material placed on top of the soil surface. Its job is to protect and improve the growing environment. Benefits include:Suppresses weed germination Reduces evaporation and watering frequency Moderates soil temperature Prevents soil crusting and compaction from heavy rain Protects soil life and organic matterOrganic mulches break down over time, feeding the soil food web and gradually improving structure. Organic vs Inorganic Mulch Organic Mulch Examples: straw, shredded leaves, compost, pine needles, grass clippings, wood chips.Improves soil as it decomposes Usually better for edible and ornamental beds Needs replenishing each seasonInorganic Mulch Examples: gravel, rubber chips, landscape fabric with rock.Longer lasting Useful in pathways or dry landscape areas Does not build soil biologyFor most home food gardens, organic mulch is the better long-term choice. Best Mulch Types by Garden Area Vegetable BedsStraw (seed-free): excellent all-purpose choice Shredded leaves: free and effective if partially decomposed Compost: great top-dressing, best paired with another mulch layerAvoid thick fresh wood chips directly in annual vegetable beds during active growing, especially around tiny seedlings. Perennial Beds and Shrub BordersWood chips: durable, slow breakdown, strong weed suppression Leaf mold: excellent moisture retention and soil conditioningPathsCoarse wood chips or bark Gravel (if you want a permanent surface)When to Apply Mulch Timing matters.In spring: wait until soil has warmed before adding thick layers around warm-season crops In summer: apply to conserve moisture and reduce stress In fall: top up beds to protect soil through winter rain and windAlways weed and water first, then mulch. How Much Mulch to Use For most beds, 2-3 inches is ideal.Less than 2 inches usually lets weeds through More than 4 inches can reduce airflow and trap too much moistureKeep mulch a few inches away from stems and trunks. Piling mulch against stems can lead to rot and pest issues. Step-by-Step Mulching ProcessRemove existing weeds, including roots where possible Water the bed deeply Add a light compost layer if needed Spread mulch evenly to 2-3 inches Pull mulch back from stems and crowns Check and refresh thin spots during the seasonThis one-time setup can save hours of weeding and frequent watering later. Common Mulching Mistakes Mulching Over Weeds Mulch suppresses new weeds but often fails against established perennial weeds. Clear the bed first. Using Hay Instead of Straw Hay often contains seeds and can create a weed problem. Choose clean straw when possible. Applying Fresh Grass Clippings Too Thick Wet grass layers can mat down and smell sour. Use thin layers or dry them before applying. Creating Mulch Volcanoes Around Plants Keep mulch off plant stems and tree trunks to prevent rot. Seasonal Maintenance PlanEarly spring: loosen compacted mulch and top up thin areas Mid-summer: check depth and add a thin refresh layer if needed Fall: add leaves or chips to protect bare soil over winterMulch is not a one-time task. Small adjustments through the season keep beds working efficiently. Final Takeaway Mulch is one of the highest-return jobs in the garden. A few hours spreading mulch can save you weeks of weeding and extra watering while steadily improving soil health. If your goal is less work and better results, start with mulch. If your back complains like mine does, do it in short rounds and call that a win. Related ReadingComposting 101: Turn Kitchen Scraps into Garden Gold How to Water a Vegetable Garden the Right Way Summer Heat Heroes: Vegetables That Thrive in Hot Weather
- 15 Feb, 2026
Container Gardening: Growing Big Harvests in Small Spaces
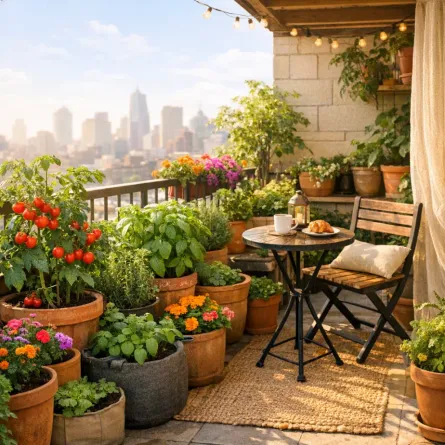
When I lived in my first apartment, I was sure my gardening dreams would have to wait until I had a "real" yard. I was so wrong. That tiny balcony became one of my most productive growing spaces, and it taught me that small spaces can still feed your spirit and your kitchen. Whether you have a balcony, patio, rooftop, or just a sunny stoop, container gardening can do a lot more than people think. Why Container Gardening Works Container gardening isn't a compromise. It's a legitimate and often superior way to grow food.Total portability: Chase the sun, dodge the frost, rearrange at will Perfect soil control: No dealing with rocky or clay-heavy ground Fewer weeds: Seriously, almost none Less pest pressure: Elevated containers dodge many soil-borne problems Accessibility: Garden at any height that's comfortable for you Looks gorgeous: Well-chosen pots add style to any spaceChoosing the Right Containers Size Matters This is the single most important decision in container gardening. Too small and your plants will struggle with heat, drought, and cramped roots.Container Size What to Grow1-2 gallons (small) Herbs, lettuce, radishes, strawberries3-5 gallons (medium) Peppers, bush beans, compact tomatoes, chard7-10 gallons (large) Full-size tomatoes, eggplant, zucchini, cucumbers15-20 gallons (XL) Potatoes, small fruit trees, multiple plantsMy rule of thumb: When in doubt, go one size bigger. Your plants will reward you. Material Options Fabric grow bags: My current favorite! They air-prune roots (preventing circling), drain beautifully, fold flat for storage, and are surprisingly affordable. The only downside: they dry out faster. Terracotta: Classic look, breathable, keeps roots cool. Heavy and breakable, but perfect for Mediterranean herbs. Plastic: Lightweight, affordable, retains moisture well. Choose dark colors with caution as they absorb heat. Glazed ceramic: Beautiful and moisture-retentive. Can be heavy and expensive. Self-watering containers: Fantastic for busy gardeners or hot climates. A built-in reservoir keeps plants consistently hydrated. The Non-Negotiable Rule Every container needs drainage holes. No exceptions. If you find a beautiful pot without holes, drill some. Sitting in waterlogged soil is the fastest way to kill a container plant. The Best Potting Mix Never use garden soil or topsoil in containers. It compacts, drains poorly, and may bring in pests and disease. My Container Mix Recipe60% quality potting mix: Look for one with peat or coco coir 20% compost: For nutrients and beneficial microbes 20% perlite: For drainage and aerationBoosting Your MixAdd slow-release organic fertilizer at planting time Mix in a handful of worm castings for a nutrient boost For moisture-loving plants, add a bit of extra coco coirHow Much Soil Do You Need? A rough guide:5-gallon pot ≈ 0.7 cubic feet of mix 10-gallon pot ≈ 1.3 cubic feet of mix A standard bag of potting mix (2 cubic feet) fills about three 5-gallon potsBest Vegetables for Containers Tomatoes The king of container gardening! Choose compact varieties bred for pots. Best varieties: Patio Princess, Tumbling Tom, Bush Early Girl, Tiny TimMinimum pot: 5 gallons (10 gallons for full-size varieties) Needs a cage or stake even in containers Full sun, consistent wateringPeppers Both sweet and hot peppers thrive in containers. Best varieties: Lunchbox, Shishito, Jalapeño, Mini BellMinimum pot: 3-5 gallons Love heat, so dark containers in full sun work well Feed regularly once fruiting startsLettuce and Salad Greens Perfect for shallow containers and window boxes. Best varieties: Buttercrunch, Red Sails, Mesclun mixes, ArugulaMinimum container: 6 inches deep Can handle partial shade (great for north-facing balconies!) Succession sow every 2-3 weeks for continuous harvestsBush Beans Productive and easy, no trellis needed. Best varieties: Provider, Contender, Mascotte (bred for containers!)Minimum pot: 3 gallons for 3-4 plants Direct sow into containers Full sun, moderate waterCucumbers Choose bush or compact varieties for pots. Best varieties: Spacemaster, Bush Pickle, Patio SnackerMinimum pot: 5 gallons Provide a small trellis or let them trail over the edge Heavy feeders and drinkersStrawberries A container gardener's dream fruit. Best varieties: Albion, Seascape, Mignonette (alpine)Hanging baskets, window boxes, and strawberry planters all work beautifully Everbearing types give fruit from spring through fall Mulch the surface to keep berries cleanWatering: The Critical Skill Watering is where container gardening demands the most attention. Pots dry out much faster than ground soil, especially in summer. The BasicsCheck daily: Stick your finger an inch into the soil. Dry? Water thoroughly. Water deeply: Until water flows from the drainage holes. This ensures the entire root zone gets moisture. Morning is best: Plants have all day to use the water, and foliage dries before evening Never let pots sit in saucers of water: Empty them after rain or wateringHot Weather Survival In peak summer, containers may need watering twice a day. Strategies to cope:Group pots together: They create a humid microclimate Use mulch: Even in containers, a layer of straw or wood chips helps Move to afternoon shade: If plants are wilting despite morning watering Self-watering inserts: Reservoir systems are a lifesaverIf watering is where your containers struggle, read How to Water a Vegetable Garden the Right Way and adapt the same deep-watering principles to pots. Vacation Planning Going away? Options include:Self-watering pots or inserts Drip irrigation on a timer (my favorite solution) Wicking systems with a bucket of water A kind neighbor or friendFeeding Your Container Garden Container plants are entirely dependent on you for food. Nutrients wash out with each watering. Feeding ScheduleAt planting: Mix slow-release organic fertilizer into the soil Every 2 weeks: Liquid fertilizer (fish emulsion, seaweed extract, or compost tea) When fruiting: Switch to a higher-potassium feed for tomatoes and peppersSigns of Nutrient DeficiencyYellow lower leaves: Often nitrogen deficiency Purple-tinged leaves: Could be phosphorus Poor fruit set: May need more potassium Slow growth overall: Time for a balanced feedContainer Garden Design Ideas The Salad Bowl Balcony Dedicate your space to a continuous salad bar:Large pot: Cherry tomato with basil Medium pots: Peppers, cucumbers Window box: Lettuce mix, arugula, radishes Hanging basket: Strawberries Small pots: Herbs (parsley, chives, cilantro)The Vertical Container Garden Go up instead of out:Stack containers on shelving or a plant stand Use hanging baskets at different heights Mount window boxes on railings Train vining plants up trellises attached to the wallThe Front Porch Kitchen Garden Mix edibles with ornamentals for a welcoming display:Large glazed pot: Dwarf tomato or pepper as the centerpiece Surrounding pots: Herbs, nasturtiums, marigolds, and trailing sweet potato vine Window boxes: Lettuces and pansiesOverwintering and Off-Season Container gardens don't have to end when summer does! Cool-Season Crops Many vegetables prefer cooler weather and thrive in fall and spring containers:Kale, spinach, and Swiss chard Peas (with a small trellis) Radishes and turnips Cilantro and parsleyProtecting from FrostMove pots against the house wall (radiant heat) Cover with frost cloth on cold nights Bring small pots indoors temporarilyMy Container Garden Story That first apartment balcony taught me that limitations can spark creativity. With just eight pots on a south-facing rail, I grew enough cherry tomatoes to share with neighbors, more basil than I could possibly eat, and lettuce so crisp I still remember the bite. Even now, with a full garden, I keep containers by the kitchen door because nothing beats stepping out with scissors and snipping herbs for dinner. Start with one pot and one plant. On days when energy is low, that small start is still more than enough. Related ReadingGrowing Herbs on Your Windowsill: Fresh Flavors Year-Round Raised Bed Gardening: Build, Fill, and Grow Your Best Garden Yet
- 12 Feb, 2026
How to Water a Vegetable Garden the Right Way
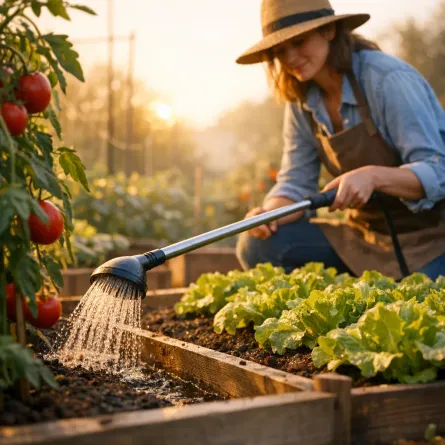
Watering sounds simple until tomatoes split, lettuce bolts, or seedlings flop over in afternoon heat. I have done all three. Healthy gardens are built on steady watering habits, not panicked rescue watering. This guide will help you water with confidence so plants grow deeper roots, produce better harvests, and stay resilient through hot spells. The Core Rule: Water Deeply, Less Often Most vegetables do best with about 1 to 1.5 inches of water per week, including rainfall. Instead of light daily sprinkles, aim for deep soakings that wet the soil 6-8 inches down. Deep watering encourages roots to grow downward where the soil stays cooler and moister. Shallow watering keeps roots near the surface, where they dry out quickly. Best Time of Day to Water Morning is the best time to water your garden.Cooler temperatures mean less evaporation Leaves dry quickly after sunrise, which lowers disease risk Plants have moisture available before midday heatIf morning is not possible, water in late afternoon. Avoid watering late in the evening, especially in humid climates, because wet foliage overnight can invite fungal disease. How to Check if You Actually Need to Water Do not water by habit alone. Check the soil first:Push your finger 2-3 inches into the soil If it feels dry at that depth, water If it still feels cool and moist, wait another dayFor larger beds, use a trowel to check deeper layers. Soil can look dry on top while still holding enough moisture below. Watering Methods Ranked 1) Drip Irrigation or Soaker Hoses (Best) These methods apply water slowly at soil level, right where roots need it.Very efficient use of water Keeps foliage dry Reduces weeds between rows Easy to automate with a timer2) Hand Watering at Soil Level A watering wand or gentle nozzle works well for small gardens.Good control around young plants Useful for containers and newly transplanted seedlingsTry to avoid splashing leaves and focus on the base of each plant. 3) Overhead Sprinklers (Use Carefully) Sprinklers are convenient but can waste water and increase disease pressure.More evaporation loss Wet leaves can promote mildew and blight Encourages weeds in pathwaysIf sprinklers are your only option, run them early in the morning. Different Crops, Different Needs Not all vegetables use water the same way.Leafy greens: prefer consistently moist soil Tomatoes and peppers: like deep, steady watering, but not soggy roots Root crops: need even moisture to prevent splitting and bitterness Cucumbers and squash: heavy drinkers during fruitingPay extra attention when crops are flowering and fruiting. Water stress at this stage can reduce both quality and yield. Container Gardens Need a Different Plan Containers dry out much faster than in-ground beds, especially in summer. If you grow mainly in pots, use this container gardening guide as your companion plan.Check containers daily in hot weather Use larger pots when possible to hold more moisture Add compost to improve water retention Mulch the top of containers with straw or shredded leavesDuring heat waves, some containers may need water once in the morning and once in late afternoon. Common Watering Mistakes Watering a Little Every Day This trains shallow roots and creates weak plants. Switch to deeper, less frequent watering. Letting Soil Swing from Bone-Dry to Waterlogged Inconsistent moisture causes cracking fruit, blossom end rot risk, and plant stress. Watering Leaves Instead of Soil Wet leaves are not useful hydration. Roots need the water. Ignoring Mulch A 2-3 inch mulch layer can dramatically reduce evaporation and smooth out moisture swings. Simple Weekly Watering Framework Use this as a starting point and adjust for weather:Cool spring weather: 1 deep watering per week Mild summer weather: 2 deep waterings per week Heat waves or sandy soil: 3 deep waterings per weekAfter heavy rain, pause watering and recheck soil moisture before resuming. Final Takeaway Great gardeners do not water more, they water smarter. Check moisture, water deeply, and keep a consistent rhythm. Within a few weeks, you should notice sturdier plants, fewer stress symptoms, and better harvests. If you only change one thing this season, change how you water. Start with one bed this week and build the habit from there. Related ReadingMulching for Healthier Garden Beds: A Practical Guide Growing Tomatoes: From Seed to Sauce