Showing Posts From
Sustainability
- 24 Mar, 2026
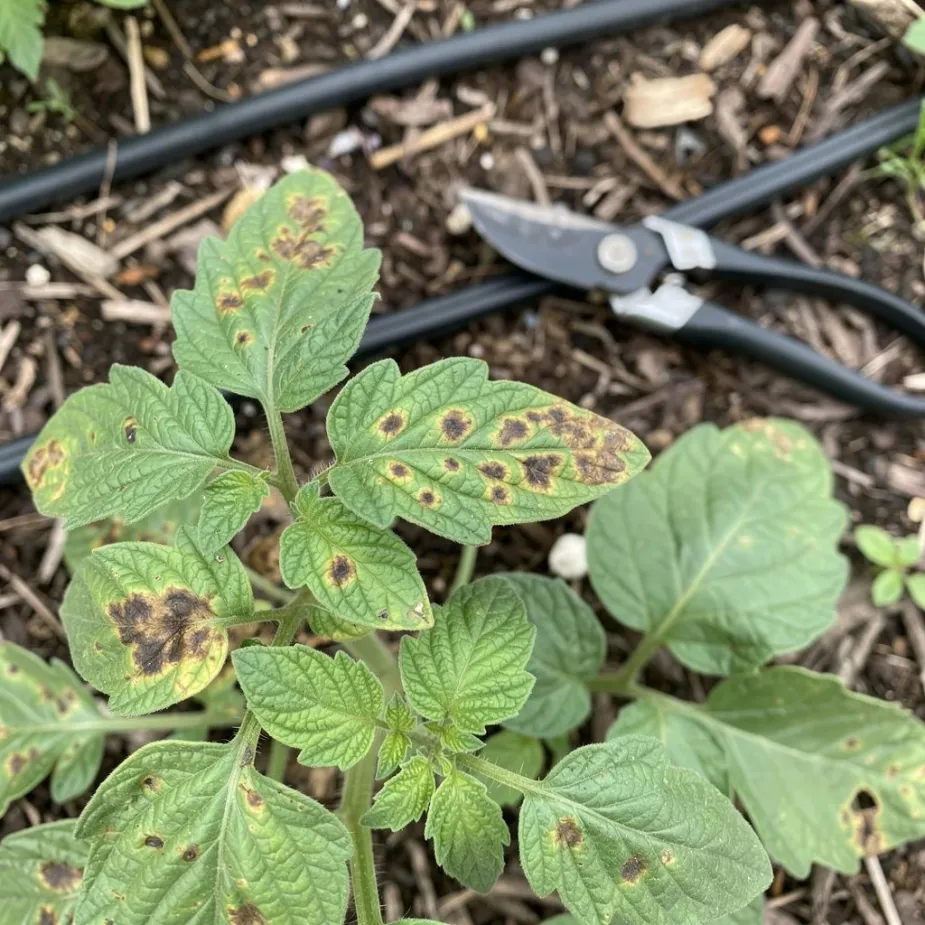
Common Garden Diseases: Identify, Prevent, and Treat Naturally
Pests get all the attention, but disease is what has broken my heart most often in the garden. One humid week can turn healthy plants into a blotchy mess. The good news is that most disease control is not about expensive sprays. It is about prevention and fast response. Why Disease Shows Up Most garden diseases need three things:A susceptible plant A pathogen (fungus, bacteria, or virus) Favorable conditions (often moisture plus poor airflow)Break one piece of that triangle and you reduce damage. Most Common Home-Garden Diseases Powdery MildewLooks like white powder on leaves Common in squash, cucumbers, zinnias Favored by crowded growth and poor airflowEarly BlightBrown spots with rings, often on lower tomato leaves Spreads upward if unmanaged Often worsens with leaf wetness and soil splashDowny MildewYellow patches on top of leaves, gray fuzz below Moves quickly in humid weather Common in cucurbits and basilDamping Off (Seedlings)Seedlings collapse at soil line Usually from overly wet, poorly ventilated seed-starting conditionsPrevention-First Routine 1) Space Plants for Airflow Crowding is a disease invitation. Give plants enough room for leaves to dry quickly after dew or rain. 2) Water the Soil, Not the Leaves Use drip irrigation, soaker hoses, or careful hand watering low at the base. For a full watering method, see How to Water a Vegetable Garden the Right Way. 3) Mulch to Reduce Soil Splash Mulch lowers the chance of pathogens splashing onto lower leaves during rain.Straw or shredded leaves work well Maintain 2-3 inches around plants4) Remove Infected Leaves Early At first sign, prune affected leaves and discard them in trash, not compost (unless your compost system runs hot enough to kill pathogens). 5) Rotate Crop Families Do not grow tomatoes in the same bed year after year. Rotation reduces disease carryover. 6) Keep Tools Clean Wipe pruners between plants if disease is active. A quick sanitize pass can prevent spread. Natural Treatment Options When prevention is not enough, these can help limit spread:Copper-based organic fungicides (follow label exactly) Potassium bicarbonate products for some fungal issues Biological fungicides (Bacillus-based) as preventative sprays Neem oil for certain fungal pressuresAlways test sprays on a small section first and avoid spraying in hot midday sun. Quick Symptom TableSymptom Likely Disease Type First ActionWhite powder on leaves Powdery mildew Remove worst leaves, improve airflow, apply targeted sprayBrown lower-leaf spotting Early blight Prune lower leaves, mulch, avoid overhead wateringSeedlings suddenly collapse Damping off Improve airflow, reduce moisture, use sterile mixLeaf yellowing with fuzzy underside Downy mildew Remove infected foliage quickly, reduce leaf wetnessWhere Pest and Disease Management Meet Healthy, unstressed plants resist disease better. Build that foundation with compost, mulch, and beneficial insect support. Pair this guide with Natural Pest Control: Protecting Your Garden Without Chemicals and Companion Planting: Friends and Foes in Your Garden. A Realistic Mindset You can do everything right and still lose a crop in a tough season. That is gardening, not failure. What matters is spotting problems earlier each year and tightening your routine. If you want one action to start today, prune lower crowded leaves on tomatoes and add fresh mulch. Small prevention steps pay off quickly. Related ReadingNatural Pest Control: Protecting Your Garden Without Chemicals Companion Planting: Friends and Foes in Your Garden Mulching for Healthier Garden Beds: A Practical Guide
- 16 Mar, 2026
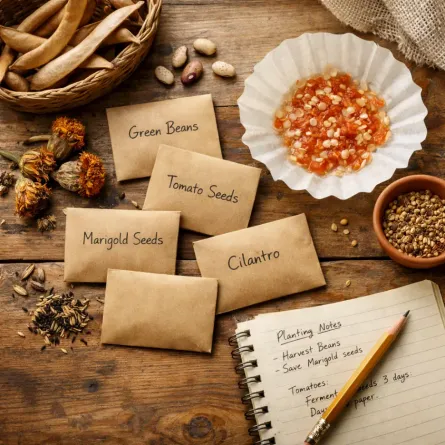
Seed Saving for Beginners: Keep the Best from This Year for Next Year
The first time I saved seeds, I felt a little ridiculous about how proud I was. It was just a labeled envelope of marigold seeds tucked in a kitchen drawer, and I looked at it like treasure. But that tiny envelope grew into one of my favorite garden habits. Seed saving is practical, yes. It can save money, preserve varieties you love, and help plants adapt over time to your garden. But it is also deeply satisfying. You close the loop from seed to plant and back to seed again. If you are new to this, start simple. You do not need to save seeds from everything your first year. Why Save Seeds? A few reasons I keep doing it:Lower costs over time Keeps favorite varieties in rotation Builds resilience with plants adapted to your conditions Feels meaningful to carry the season forwardOne note right away: seed saving is easiest and most reliable with open-pollinated and heirloom varieties. Know What Not to Save (Yet) You can save seeds from hybrid plants, but they often will not grow "true" next season. That means the new plants may be different in size, flavor, productivity, or color. For best beginner success:Choose open-pollinated varieties Label plants at planting time so you remember what they areEasiest Crops to Start With If you are anything like me, quick wins keep the motivation up. Beans and Peas These are wonderfully easy.Leave healthy pods on the plant until they dry fully. Harvest when pods are papery and brittle. Shell and remove damaged seeds. Let seeds air-dry another few days indoors.Store in a cool, dry place. Lettuce Let one or two plants bolt and flower. After flowering, fluffy seed heads form.Collect when heads look dry and feathery Rub gently between fingers to release seed Separate as much chaff as practicalNot glamorous, but very doable. Marigolds and Zinnias Perfect for beginners and very forgiving.Wait until blooms are fully dry on the plant Pull seed heads and break apart over a bowl Remove moisture-prone petals/debris before storageMy first saved marigolds came up like little old friends the next spring. Tomatoes: Slightly More Steps, Still Worth It Tomatoes need fermentation to remove the gel coating around the seed. Simple Tomato Seed ProcessScoop seeds and gel into a jar with a little water. Let sit 2-4 days at room temperature, stirring daily. Once a light mold forms, add water and pour off floating pulp. Rinse good seeds that sink. Spread seeds on a plate or coffee filter to dry completely (about 5-7 days).Label clearly with variety and year. If tomatoes are your main crop, pair this with your existing Growing Tomatoes Guide so you can track which varieties truly earn a repeat spot. Keep Seeds Dry, Dark, and Cool Storage matters as much as collection. My simple setup:Paper envelopes for each variety Envelopes inside a sealed glass jar Jar stored in a cool closet Silica packet or dry rice pouch nearby for humidity controlWhat I write on every envelope:Variety name Crop type Date saved Notes (flavor, vigor, disease issues)That little note line helps so much when planning spring sowing. Common Mistakes (I Have Made Most of These)Storing seeds before fully dry Forgetting labels (you will not "definitely remember") Saving from weak or diseased plants Mixing varieties accidentallyIf a batch fails, do not take it personally. Seed saving is a skill, and each season teaches you something. How Long Seeds Usually Last General home-storage ranges:Beans and peas: 3-5 years Tomatoes: 4-6 years Lettuce: 2-4 years Marigolds/zinnias: 2-5 yearsViability depends on storage conditions. If in doubt, do a quick germination test before planting season. Quick Germination TestPlace 10 seeds on a damp paper towel. Fold and place inside a loosely sealed bag. Keep warm and check after several days. Count how many sprout.If 8 out of 10 sprout, you are around 80% germination. Easy math, very helpful. A Gentle First-Year Seed-Saving Plan If you want a calm start, try this:Save one flower (marigold or zinnia) Save one easy vegetable (bean or pea) Save one "stretch" crop (tomato)That is enough to build confidence and keep it enjoyable. Last fall, I sat at my kitchen table with a cup of tea and a stack of little seed envelopes, labeling them while rain tapped at the windows. It felt old-fashioned in the best way, like I was writing a note to next spring. Start with one packet this year. One is plenty. By next season, when those saved seeds wake up in your soil, you will understand exactly why gardeners get attached to this process. Related ReadingSpring Garden Planning: Getting Ready for the Growing Season Succession Planting for Continuous Harvests Creating a Pollinator Paradise: Attracting Bees and Butterflies to Your Garden
- 09 Mar, 2026
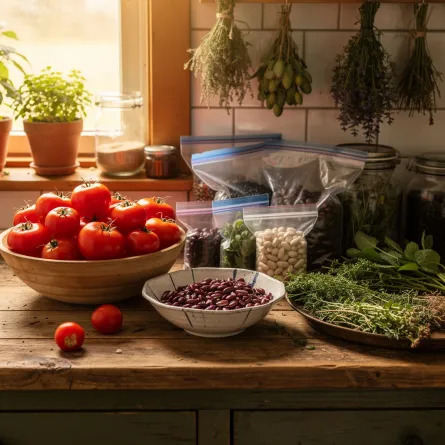
From Garden to Pantry: Easy Preserving for Beginners
There is a very specific kind of summer panic when zucchini, beans, and tomatoes all come in at once. I have stood in my kitchen looking at bowls of produce like, "Well, this escalated quickly." Preserving is how I keep that abundance from turning into guilt. Start with the Easiest Method First You do not need to do everything in year one. Pick one method and get comfortable.Freezing: easiest entry point Drying: great for herbs, some fruits, and peppers Canning: useful and satisfying, but follow safe tested methods closelyFreezing Basics Freezing is my weeknight lifesaver. Best forGreen beans (blanched) Peas (blanched) Corn kernels (blanched) Chopped peppers (raw) Tomato sauce (cooked) Herbs in oil or water cubesBasic ProcessWash and prep produce Blanch vegetables when needed Cool quickly in ice water Drain thoroughly Pack in freezer-safe bags or containers Label with date and contentsI write dates in big marker because future me does not enjoy guessing games. Drying Basics Drying is wonderful when freezer space is tight. Best forHerbs (basil, oregano, thyme, mint) Hot peppers Apple slices Cherry tomatoes (with proper dehydrator settings)TipsKeep pieces uniform for even drying Use low heat and good airflow Store fully dried foods in airtight jars away from lightIf moisture remains, food can mold. When in doubt, dry a little longer. Canning: Keep It Safe and Simple Canning is deeply rewarding, but safety matters.Use tested recipes from trusted sources Water-bath can high-acid foods (like many jams, pickles, some tomato recipes) Pressure can low-acid foods (most vegetables, meats, broths) Never wing acidity levelsIf you are brand new, begin with a simple jam or pickle recipe from a tested source and learn the workflow. What to Preserve First (Beginner Priority List) When harvest is heavy and energy is low, this is my order:Freeze what spoils fastest Dry herbs before they flower or yellow Turn soft tomatoes into quick sauce for freezing Save canning projects for a calmer dayThis keeps food from being lost while still protecting your back and your sanity. Pair Preserving with Garden Planning If you plan to preserve, plant for it on purpose.Grow paste tomatoes for sauce Plant extra basil for drying/pesto cubes Choose bean varieties that freeze well Stagger plantings to avoid one giant harvest spikeThat rhythm works beautifully with Succession Planting for Continuous Harvests. My Quiet Favorite Winter Moment On a gray January day, opening a jar or freezer container from your own garden feels like a small love note from summer. It really does. If you feel overwhelmed by preserving, pick one tray of produce this week and freeze it. Small batches count. Related ReadingLate-Summer Garden Reset: What I Do When the Beds Look Tired Growing Tomatoes: From Seed to Sauce Succession Planting for Continuous Harvests

- 20 Feb, 2026
Mulching for Healthier Garden Beds: A Practical Guide
If compost is garden gold, mulch is the cozy blanket that keeps your soil steady and productive. A well-mulched bed needs less watering, grows fewer weeds, and handles weather swings much better. The best part is that mulching is simple once you know a few practical rules. Why Mulch Matters Mulch is any material placed on top of the soil surface. Its job is to protect and improve the growing environment. Benefits include:Suppresses weed germination Reduces evaporation and watering frequency Moderates soil temperature Prevents soil crusting and compaction from heavy rain Protects soil life and organic matterOrganic mulches break down over time, feeding the soil food web and gradually improving structure. Organic vs Inorganic Mulch Organic Mulch Examples: straw, shredded leaves, compost, pine needles, grass clippings, wood chips.Improves soil as it decomposes Usually better for edible and ornamental beds Needs replenishing each seasonInorganic Mulch Examples: gravel, rubber chips, landscape fabric with rock.Longer lasting Useful in pathways or dry landscape areas Does not build soil biologyFor most home food gardens, organic mulch is the better long-term choice. Best Mulch Types by Garden Area Vegetable BedsStraw (seed-free): excellent all-purpose choice Shredded leaves: free and effective if partially decomposed Compost: great top-dressing, best paired with another mulch layerAvoid thick fresh wood chips directly in annual vegetable beds during active growing, especially around tiny seedlings. Perennial Beds and Shrub BordersWood chips: durable, slow breakdown, strong weed suppression Leaf mold: excellent moisture retention and soil conditioningPathsCoarse wood chips or bark Gravel (if you want a permanent surface)When to Apply Mulch Timing matters.In spring: wait until soil has warmed before adding thick layers around warm-season crops In summer: apply to conserve moisture and reduce stress In fall: top up beds to protect soil through winter rain and windAlways weed and water first, then mulch. How Much Mulch to Use For most beds, 2-3 inches is ideal.Less than 2 inches usually lets weeds through More than 4 inches can reduce airflow and trap too much moistureKeep mulch a few inches away from stems and trunks. Piling mulch against stems can lead to rot and pest issues. Step-by-Step Mulching ProcessRemove existing weeds, including roots where possible Water the bed deeply Add a light compost layer if needed Spread mulch evenly to 2-3 inches Pull mulch back from stems and crowns Check and refresh thin spots during the seasonThis one-time setup can save hours of weeding and frequent watering later. Common Mulching Mistakes Mulching Over Weeds Mulch suppresses new weeds but often fails against established perennial weeds. Clear the bed first. Using Hay Instead of Straw Hay often contains seeds and can create a weed problem. Choose clean straw when possible. Applying Fresh Grass Clippings Too Thick Wet grass layers can mat down and smell sour. Use thin layers or dry them before applying. Creating Mulch Volcanoes Around Plants Keep mulch off plant stems and tree trunks to prevent rot. Seasonal Maintenance PlanEarly spring: loosen compacted mulch and top up thin areas Mid-summer: check depth and add a thin refresh layer if needed Fall: add leaves or chips to protect bare soil over winterMulch is not a one-time task. Small adjustments through the season keep beds working efficiently. Final Takeaway Mulch is one of the highest-return jobs in the garden. A few hours spreading mulch can save you weeks of weeding and extra watering while steadily improving soil health. If your goal is less work and better results, start with mulch. If your back complains like mine does, do it in short rounds and call that a win. Related ReadingComposting 101: Turn Kitchen Scraps into Garden Gold How to Water a Vegetable Garden the Right Way Summer Heat Heroes: Vegetables That Thrive in Hot Weather
- 08 Feb, 2026
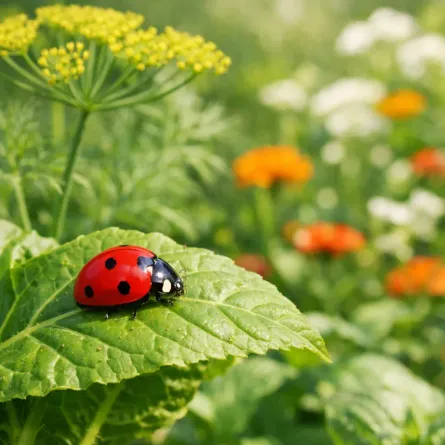
Natural Pest Control: Protecting Your Garden Without Chemicals
I'll never forget the morning I walked out and found my prized kale absolutely shredded by cabbage worms. My first instinct was to grab a spray, but I'm so glad I paused. That one rough morning sent me down the path of natural pest control, and my garden has been healthier and more balanced ever since. A Different Mindset The goal of natural pest control isn't to eliminate every single bug. It's about creating balance. A healthy garden has pests AND predators living in equilibrium. A few aphids on your roses? That's dinner for ladybugs. Some caterpillars nibbling your dill? They'll become the swallowtail butterflies you love. The key is keeping pest populations in check, not waging all-out war. Prevention: Your First Line of Defense The best pest control starts before you ever see a bug. Healthy Soil, Healthy Plants Plants growing in nutrient-rich, well-balanced soil are naturally more resistant to pests and disease. Think of it like your immune system: when you're well-nourished, you fight off illness better.Amend with compost regularly Test your soil every few years Mulch to support soil life Avoid over-fertilizing with nitrogen (it produces lush, soft growth that pests love)Choose Resistant Varieties Many modern vegetable varieties have been bred for pest and disease resistance. Look for these codes on seed packets:V: Verticillium wilt resistant F: Fusarium wilt resistant N: Nematode resistant T: Tobacco mosaic virus resistantPractice Good Garden HygieneRemove diseased plant material promptly Clean up fallen fruit and debris Rotate crops annually Space plants properly for good air circulation Water at soil level, not on foliageBeneficial Insects: Nature's Pest Control This is where it gets exciting. The insect world is full of tiny garden heroes! Ladybugs The most famous beneficial insect, and for good reason.What they eat: A single ladybug can devour 5,000 aphids in its lifetime! How to attract them: Plant dill, fennel, yarrow, and marigolds Bonus: Their larvae are even more voracious than the adultsLacewings Delicate green insects with an appetite for destruction (of pests).What they eat: Aphids, mealybugs, thrips, whiteflies, and small caterpillars How to attract them: Plant cosmos, coreopsis, and sweet alyssum Fun fact: Their larvae are called "aphid lions"Parasitic Wasps Don't worry, these tiny wasps don't sting humans!What they do: Lay eggs inside pest insects like aphids, caterpillars, and hornworms How to attract them: Plant small-flowered herbs like dill, cilantro, and parsley Look for: Mummified aphids (brown, papery) — that means wasps are at workGround Beetles These nocturnal hunters patrol your garden at night.What they eat: Slugs, snails, cutworms, and other soil-dwelling pests How to attract them: Provide ground cover, mulch, and stones for daytime hiding spotsHoverflies They look like tiny bees but are actually flies, and their larvae are aphid-eating machines.What they eat: Aphids, thrips, and scale insects How to attract them: Plant sweet alyssum, calendula, and herbs in flowerPhysical Barriers Sometimes the simplest solutions are the best. Row Covers Lightweight fabric draped over crops keeps flying pests out while letting light and rain through.Best for: Cabbage moths, flea beetles, squash vine borers Remove when: Plants need pollination (squash, cucumbers, peppers)Copper Tape A ring of copper tape around pots or raised beds gives slugs and snails a mild electric shock. Collars Cardboard or plastic collars around seedling stems prevent cutworm damage. Push them an inch into the soil. Netting Fine mesh netting protects berries and brassicas from birds and butterflies. Homemade Sprays and Solutions When prevention isn't enough, these gentle remedies can help. Garlic-Pepper Spray A broad-spectrum pest deterrent. Recipe:Blend 2 whole garlic bulbs with 2 hot peppers and 1 tablespoon of castile soap Strain through cheesecloth Dilute 1/4 cup concentrate in 1 quart of water Spray on affected plants in the eveningNeem Oil Derived from the neem tree, it disrupts pest feeding and reproduction.Effective against: Aphids, whiteflies, mealybugs, Japanese beetles Mix according to package directions Apply in the morning or evening (never in direct sun) Reapply after rainDiatomaceous Earth (Food-Grade) A fine powder made from fossilized algae that damages the exoskeletons of crawling insects.Dust around plant bases for slugs, earwigs, and ants Reapply after rain or watering Caution: It doesn't discriminate, so avoid dusting flowers where bees visitSoap Spray For soft-bodied insects like aphids, mealybugs, and spider mites.Mix 1 tablespoon of pure castile soap in 1 quart of water Spray directly on pests Rinse plants with clean water after a few hours Test on a small area first, some plants are sensitiveCommon Pests and What to DoPest Signs Natural SolutionsAphids Clusters on new growth, sticky residue Ladybugs, soap spray, strong water blastSlugs & Snails Holes in leaves, slime trails Beer traps, copper tape, diatomaceous earthCabbage Worms Holes in brassica leaves Row covers, hand-picking, Bt sprayTomato Hornworms Defoliated tomato plants Hand-pick (look for white cocoons — that's parasitic wasps!)Japanese Beetles Skeletonized leaves Hand-pick into soapy water, neem oil, milky sporeSquash Bugs Wilting leaves, egg clusters Hand-pick, crush eggs, trap under boardsFlea Beetles Tiny holes in leaves Row covers, neem oil, trap crops (radishes)Building a Pest-Resistant Garden Long-term pest management is about building an ecosystem, not buying products. Here's my approach:Plant diversely: Monocultures attract pests. Mix it up! Include flowers everywhere: Beneficial insects need nectar and pollen Provide habitat: Bug hotels, mulch, ground cover, and water sources Tolerate some damage: A perfect garden isn't a natural one Observe daily: Catch problems early before they become infestations Keep learning: Each season teaches you something new about your local ecosystemMy Turning Point These days, finding pests in my garden doesn't fill me with panic. It's more of a puzzle to solve. Last summer I spotted aphids on my peppers, resisted the urge to spray, and waited. Within a week, ladybugs showed up in force. Watching that balance return on its own was one of the most rewarding things I've seen in the garden. Work with nature, not against it, and you'll usually see more stability each season. Start small and keep observing, that's where confidence comes from. Related ReadingCompanion Planting: Friends and Foes in Your Garden Creating a Pollinator Paradise: Attracting Bees and Butterflies to Your Garden Common Garden Diseases: Identify, Prevent, and Treat Naturally
- 08 Jan, 2026
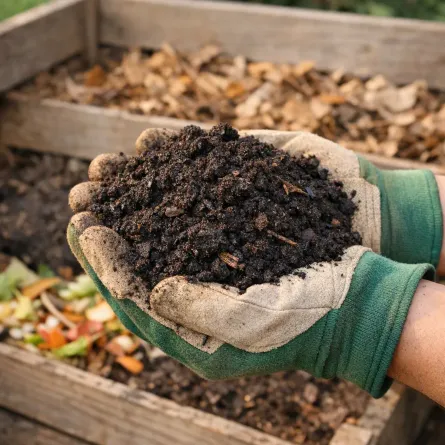
Composting 101: Turn Kitchen Scraps into Garden Gold
If there's one thing that transformed my garden more than anything else, it's compost. This "black gold" has saved me money, improved my soil, and honestly made me feel less wasteful. If composting sounds messy or complicated, I promise it's simpler (and less smelly) than most of us fear. Why Compost? Before we dive into the how, let's talk about the why:Reduces waste: Up to 30% of household waste can be composted Improves soil: Adds nutrients and beneficial microorganisms Saves money: No need to buy fertilizers or soil amendments Fights climate change: Keeps organic matter out of landfills where it produces methaneThe Basic Science Composting is simply controlled decomposition. You're creating the perfect environment for bacteria, fungi, and other organisms to break down organic matter. The key is balancing:Greens (nitrogen-rich): Kitchen scraps, grass clippings, coffee grounds Browns (carbon-rich): Dry leaves, cardboard, straw Air and moistureThe ideal ratio is about 3 parts browns to 1 part greens. If your pile smells bad, add more browns. If it's not breaking down, add more greens. What to Compost Yes, Please! ✅Fruit and vegetable scraps Coffee grounds and filters Tea bags (remove staples) Eggshells (crushed) Dry leaves Grass clippings (in moderation) Cardboard and paper (shredded) Wood chips and sawdust Garden trimmingsNo, Thanks! ❌Meat, fish, and bones Dairy products Oils and fats Diseased plants Weeds with seeds Pet waste Treated woodComposting Methods Traditional Bin Composting The classic method! You can buy a compost bin or make one from pallets or wire mesh. Pros: Low maintenance, large capacityCons: Takes 3-12 months, requires outdoor space Tumbler Composting A rotating drum that makes turning easy. Pros: Faster decomposition (1-3 months), pest-resistantCons: More expensive, limited capacity Vermicomposting (Worm Composting) Red wiggler worms do the work for you! Pros: Works indoors, produces amazing castings, fastCons: Requires maintaining worm population, limited to food scraps Bokashi Composting A Japanese method using fermentation. Pros: Can include meat and dairy, works indoors, fastCons: Requires special bran, produces pre-compost that needs finishing Getting Started: A Simple GuideChoose your method based on your space and needs Pick a location: partial shade, good drainage, convenient access Start with a layer of browns (about 4 inches) Add your greens Cover with more browns Keep it moist (like a wrung-out sponge) Turn regularly (every 1-2 weeks for faster results)Troubleshooting Common ProblemsProblem Cause SolutionBad smell Too wet or too many greens Add browns, turn pileNot decomposing Too dry or not enough greens Add water and greensPests Exposed food scraps Bury scraps in center, add brownsToo slow Pile too small or dry Build bigger pile, add waterHow to Know It's Ready Finished compost is:Dark brown or black Crumbly texture Earthy smell No recognizable original materialsThis usually takes 2-6 months depending on your method and attention. Using Your Compost Once you have that beautiful black gold:Mix into planting beds before sowing Use as mulch around established plants Make compost tea for liquid feeding Add to potting mixes (about 25%)My Compost Journey I started with a simple wire bin in the corner of my yard and a lot of guesswork. Now I have three bins in different stages, and I almost never buy bagged soil amendments anymore. There's something deeply satisfying about this cycle: kitchen scraps become compost, compost feeds the garden, and the garden feeds us. Start your compost pile today and use your first finished batch where it will make the biggest impact. Even one small bin is enough to get the rhythm going. Related ReadingMulching for Healthier Garden Beds: A Practical Guide Raised Bed Gardening: Build, Fill, and Grow Your Best Garden Yet Spring Soil Testing and Amendments: Start Strong Without Guessing