Showing Posts From
Tips techniques
- 14 Mar, 2026
Late-Summer Garden Reset: What I Do When the Beds Look Tired
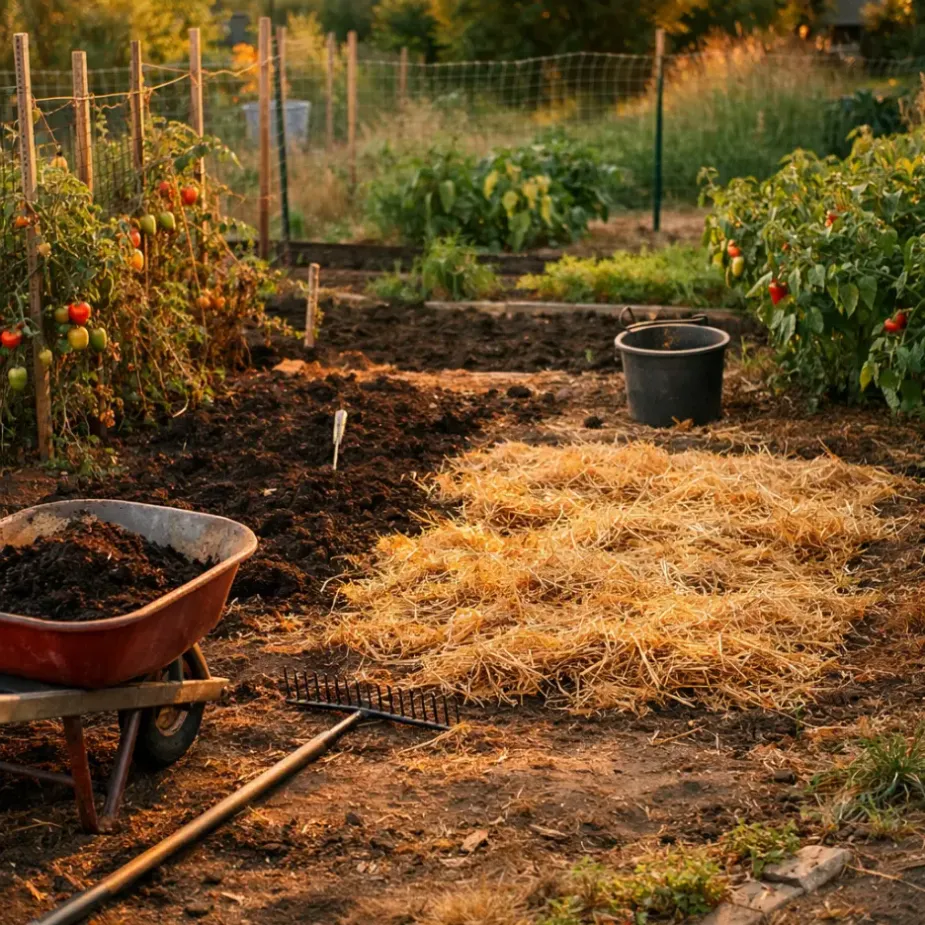
By late summer, my garden always looks a little... honest. Tomatoes are sprawling, cucumbers are dramatic, some beds are glorious, and some look like they gave up two weeks ago. For years, I used to feel behind at this point in the season. Now I treat late summer as a reset window, not a failure report card. A good reset helps the garden finish strong and makes fall planting much easier. Step 1: Do a Gentle Garden Walk-Through Before pulling anything, I walk the whole garden with a notebook. I check three things in each bed:What is still producing well? What is declining or disease-prone? What space can be reopened for fall crops?This takes 15 minutes and saves me hours of random, unfocused effort. Step 2: Remove What Is Truly Done I used to leave tired plants too long out of guilt. Now I am more practical. Pull or cut back:Spent annuals that are no longer blooming Vegetable plants with clear disease decline Crops that bolted and turned bitter Broken supports and tangled twineHealthy, non-diseased material can go to compost. If disease is present, remove from the garden and discard according to local guidance. If compost is part of your rhythm, this Composting 101 post is handy for deciding what can safely go in. Step 3: Tidy and Re-Support the Keepers Some plants still have plenty left to give in late summer. I usually keep and tidy:Productive tomatoes and peppers Ongoing herbs (basil, parsley, oregano) Flowering pollinator plants still feeding beesQuick actions that make a big difference:Re-tie tomatoes to stakes or strings Remove yellowing lower leaves for better airflow Harvest regularly to encourage continued production Thin crowded growth where humidity is trapping moistureStep 4: Refresh Soil in Open Spaces When a bed section clears, I top it up right away. My basic reset mix:1-2 inches compost Light rake-in at the surface Water deeply to settleIf a bed has had heavy feeders all season (like tomatoes), I may add a balanced organic fertilizer before fall planting. Step 5: Re-Mulch Like You Mean It By now, mulch has usually thinned out or broken down. A fresh layer helps with:Moisture retention during hot spells Fewer weeds in transition weeks More even soil temperaturesI aim for about 2 inches around established plants, keeping mulch a bit back from stems. If mulching has felt confusing, this Mulching Guide explains what to use and where. Step 6: Reset Watering for Reality Late summer watering needs shift quickly as nights cool and days shorten. I adjust by:Checking soil moisture before watering Watering deeply but less often where possible Prioritizing new transplants and containersAnd I remind myself: wilting at noon does not always mean drought. Check soil first before adding more water. Step 7: Plant the Next Wave This is where the reset pays off. Cleared pockets become prime spots for cool-season crops. Depending on your climate, consider:Lettuce, arugula, spinach Radishes and turnips Kale and chard Cilantro, dill, parsleyFor full timing, your Fall Vegetable Gardening Guide has the step-by-step planning approach. Step 8: Take Notes for Next Year I keep this very simple. At the end of a reset day, I write:one thing that worked one thing that struggled one change to make next seasonThat tiny habit has improved my garden more than any fancy tool. My Two-Hour Late-Summer Reset Plan When I am short on energy, this is my realistic version:20 minutes: walk-through and notes 35 minutes: remove spent plants from one or two beds 25 minutes: compost + rake + water in open spaces 20 minutes: re-tie and tidy productive plants 20 minutes: sow quick fall crops or transplant startsThen I stop. Even if more could be done. A couple summers ago I sat on the back step after one of these reset sessions, sweaty and dusty and not exactly glamorous, and realized the garden looked calm again. Not perfect. Just cared for. If your beds look tired right now, you have not missed your chance. Start with one bed this week, reset it gently, and let that small momentum carry you into fall. Related ReadingSummer Heat Heroes: Vegetables That Thrive in Hot Weather Common Garden Diseases: Identify, Prevent, and Treat Naturally Fall Vegetable Gardening: What to Plant and When
- 10 Mar, 2026
Gentle Gardening: How I Keep Growing with Achy Knees and a Complaining Back
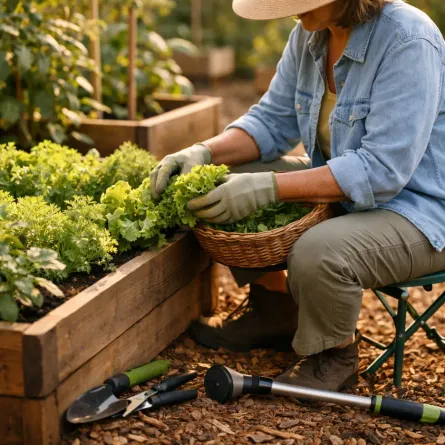
I used to think "real" gardening meant kneeling for hours, hauling heavy bags, and powering through no matter how stiff I felt. These days, my knees have opinions and my lower back has a full-time complaint department. And honestly? I still garden just as much. I just garden smarter. If your body is changing, if your energy dips by mid-afternoon, if you love your garden but dread how you will feel afterward, you are not doing anything wrong. You just need a different rhythm. Let Go of the All-or-Nothing Mindset The biggest shift for me was this: a 20-minute garden session counts. Not every day needs to be a "big garden day." In fact, I now plan for short sessions on purpose.15-20 minutes: weeding one bed 20 minutes: deadheading and quick watering check 30 minutes: harvesting and tidying pathsThree short sessions in a week often do more than one exhausting marathon that leaves you sore for two days. Build Comfort into the Garden Itself Raised Beds Save More Than Time If your back complains when you bend, raised beds are worth every bit of effort and cost. What has helped me most:Beds 12-18 inches high for easier reaching Paths wide enough for a stool or garden cart Keeping bed width to about 3-4 feet so I can reach the center without stretchingIf you are thinking about setup, this guide on Raised Bed Gardening is a great companion. Add Places to Sit I have a small folding stool that follows me around like a loyal dog. Best purchase I made in years.Use a garden kneeler/bench combo Keep one stool in each main garden zone Sit for sowing, thinning, and harvesting low cropsSit-down gardening is still gardening. Period. Soften the Ground You Walk On Hard, uneven paths make fatigue worse. I noticed this right away.Add wood chips or fine gravel on paths Remove tripping hazards and edging that catches your foot Use stepping stones in muddy spotsSmall path upgrades can make long-term gardening feel safer and less tiring. Use Tools That Work with You For years I used whatever cheap tools were around. My hands and shoulders paid for it. Now I choose tools with comfort first:Long-handled weeders to reduce bending Ergonomic grips for less wrist strain Lightweight hoses or watering wands A wheeled cart instead of carrying loadsIf a tool makes you wince, replace it when you can. You are not being fussy. You are protecting your body so you can keep gardening for years. Pace Your Work Like You Mean It I break tasks into categories: bend-heavy, lift-heavy, and easy-standing jobs. Then I alternate. Example of a kinder flow:10 minutes of weeding (bend-heavy) 10 minutes of pruning or tying plants (standing) 10 minutes of harvesting (mixed) Quick clean-up and doneI also use what I call the "tea timer rule": when the timer goes off, I stand up, stretch, and check in with my back before deciding to continue. Choose High-Reward, Low-Strain Crops Some crops are generous without demanding acrobatics. My personal favorites:Bush beans: productive and easy to pick Lettuce mixes: quick harvests, little fuss Herbs near the door: easy snip-and-go Zinnias: cheerful, resilient, and excellent for cuttingI still grow a few ambitious things, but I balance them with plants that make me feel successful. Watering Without Wearing Yourself Out Dragging a heavy hose across the yard used to finish me off. Now I rely on systems and routines:Soaker hoses or drip lines in main beds Watering wand with shutoff valve for containers Morning checks to avoid emergency evening wateringIf watering feels like a daily battle, this post on How to Water a Vegetable Garden the Right Way is very useful, and the same principles apply beautifully to beds and pots. Recovery Is Part of Gardening I did not use to count recovery as garden work. I do now. After every session:2-3 minutes gentle stretching Water for me, not just the plants A quick note in my journal about what to do nextThat last one helps me start easier tomorrow. No spinning wheels, no standing there wondering where to begin. A Gentle Weekly Plan That Actually Works Here is the rhythm I use in spring and summer:Monday: 20 minutes weeding one bed Wednesday: 20-30 minutes planting or pruning Friday: harvest + deadheading + path tidy Weekend (optional): one bigger project only if my body feels up for itNotice there is built-in grace. Missing one day does not ruin the week. My Quiet Rule for Hard Days Some mornings my back is loud before I even make coffee. On those days, I pick one tiny task:pinch basil tips pull five weeds refill the birdbathThat is enough. Truly. A few summers ago, I sat on my little bench after ten slow minutes of deadheading and watched bees move through the salvia. I had done almost nothing by old standards, but I felt calm and proud and very much alive. That is the kind of gardening I want now. Start where your body is today, not where it was twenty years ago. One raised bed, one stool, one short session at a time is still a beautiful garden life.
- 15 Feb, 2026
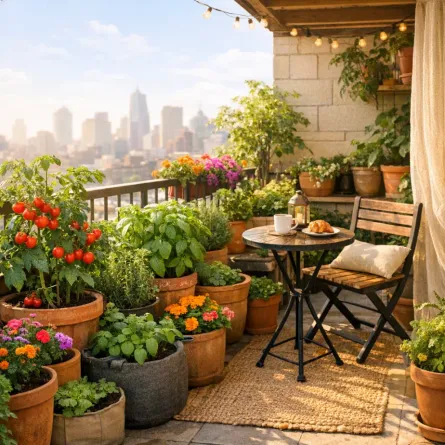
Container Gardening: Growing Big Harvests in Small Spaces
When I lived in my first apartment, I was sure my gardening dreams would have to wait until I had a "real" yard. I was so wrong. That tiny balcony became one of my most productive growing spaces, and it taught me that small spaces can still feed your spirit and your kitchen. Whether you have a balcony, patio, rooftop, or just a sunny stoop, container gardening can do a lot more than people think. Why Container Gardening Works Container gardening isn't a compromise. It's a legitimate and often superior way to grow food.Total portability: Chase the sun, dodge the frost, rearrange at will Perfect soil control: No dealing with rocky or clay-heavy ground Fewer weeds: Seriously, almost none Less pest pressure: Elevated containers dodge many soil-borne problems Accessibility: Garden at any height that's comfortable for you Looks gorgeous: Well-chosen pots add style to any spaceChoosing the Right Containers Size Matters This is the single most important decision in container gardening. Too small and your plants will struggle with heat, drought, and cramped roots.Container Size What to Grow1-2 gallons (small) Herbs, lettuce, radishes, strawberries3-5 gallons (medium) Peppers, bush beans, compact tomatoes, chard7-10 gallons (large) Full-size tomatoes, eggplant, zucchini, cucumbers15-20 gallons (XL) Potatoes, small fruit trees, multiple plantsMy rule of thumb: When in doubt, go one size bigger. Your plants will reward you. Material Options Fabric grow bags: My current favorite! They air-prune roots (preventing circling), drain beautifully, fold flat for storage, and are surprisingly affordable. The only downside: they dry out faster. Terracotta: Classic look, breathable, keeps roots cool. Heavy and breakable, but perfect for Mediterranean herbs. Plastic: Lightweight, affordable, retains moisture well. Choose dark colors with caution as they absorb heat. Glazed ceramic: Beautiful and moisture-retentive. Can be heavy and expensive. Self-watering containers: Fantastic for busy gardeners or hot climates. A built-in reservoir keeps plants consistently hydrated. The Non-Negotiable Rule Every container needs drainage holes. No exceptions. If you find a beautiful pot without holes, drill some. Sitting in waterlogged soil is the fastest way to kill a container plant. The Best Potting Mix Never use garden soil or topsoil in containers. It compacts, drains poorly, and may bring in pests and disease. My Container Mix Recipe60% quality potting mix: Look for one with peat or coco coir 20% compost: For nutrients and beneficial microbes 20% perlite: For drainage and aerationBoosting Your MixAdd slow-release organic fertilizer at planting time Mix in a handful of worm castings for a nutrient boost For moisture-loving plants, add a bit of extra coco coirHow Much Soil Do You Need? A rough guide:5-gallon pot ≈ 0.7 cubic feet of mix 10-gallon pot ≈ 1.3 cubic feet of mix A standard bag of potting mix (2 cubic feet) fills about three 5-gallon potsBest Vegetables for Containers Tomatoes The king of container gardening! Choose compact varieties bred for pots. Best varieties: Patio Princess, Tumbling Tom, Bush Early Girl, Tiny TimMinimum pot: 5 gallons (10 gallons for full-size varieties) Needs a cage or stake even in containers Full sun, consistent wateringPeppers Both sweet and hot peppers thrive in containers. Best varieties: Lunchbox, Shishito, Jalapeño, Mini BellMinimum pot: 3-5 gallons Love heat, so dark containers in full sun work well Feed regularly once fruiting startsLettuce and Salad Greens Perfect for shallow containers and window boxes. Best varieties: Buttercrunch, Red Sails, Mesclun mixes, ArugulaMinimum container: 6 inches deep Can handle partial shade (great for north-facing balconies!) Succession sow every 2-3 weeks for continuous harvestsBush Beans Productive and easy, no trellis needed. Best varieties: Provider, Contender, Mascotte (bred for containers!)Minimum pot: 3 gallons for 3-4 plants Direct sow into containers Full sun, moderate waterCucumbers Choose bush or compact varieties for pots. Best varieties: Spacemaster, Bush Pickle, Patio SnackerMinimum pot: 5 gallons Provide a small trellis or let them trail over the edge Heavy feeders and drinkersStrawberries A container gardener's dream fruit. Best varieties: Albion, Seascape, Mignonette (alpine)Hanging baskets, window boxes, and strawberry planters all work beautifully Everbearing types give fruit from spring through fall Mulch the surface to keep berries cleanWatering: The Critical Skill Watering is where container gardening demands the most attention. Pots dry out much faster than ground soil, especially in summer. The BasicsCheck daily: Stick your finger an inch into the soil. Dry? Water thoroughly. Water deeply: Until water flows from the drainage holes. This ensures the entire root zone gets moisture. Morning is best: Plants have all day to use the water, and foliage dries before evening Never let pots sit in saucers of water: Empty them after rain or wateringHot Weather Survival In peak summer, containers may need watering twice a day. Strategies to cope:Group pots together: They create a humid microclimate Use mulch: Even in containers, a layer of straw or wood chips helps Move to afternoon shade: If plants are wilting despite morning watering Self-watering inserts: Reservoir systems are a lifesaverIf watering is where your containers struggle, read How to Water a Vegetable Garden the Right Way and adapt the same deep-watering principles to pots. Vacation Planning Going away? Options include:Self-watering pots or inserts Drip irrigation on a timer (my favorite solution) Wicking systems with a bucket of water A kind neighbor or friendFeeding Your Container Garden Container plants are entirely dependent on you for food. Nutrients wash out with each watering. Feeding ScheduleAt planting: Mix slow-release organic fertilizer into the soil Every 2 weeks: Liquid fertilizer (fish emulsion, seaweed extract, or compost tea) When fruiting: Switch to a higher-potassium feed for tomatoes and peppersSigns of Nutrient DeficiencyYellow lower leaves: Often nitrogen deficiency Purple-tinged leaves: Could be phosphorus Poor fruit set: May need more potassium Slow growth overall: Time for a balanced feedContainer Garden Design Ideas The Salad Bowl Balcony Dedicate your space to a continuous salad bar:Large pot: Cherry tomato with basil Medium pots: Peppers, cucumbers Window box: Lettuce mix, arugula, radishes Hanging basket: Strawberries Small pots: Herbs (parsley, chives, cilantro)The Vertical Container Garden Go up instead of out:Stack containers on shelving or a plant stand Use hanging baskets at different heights Mount window boxes on railings Train vining plants up trellises attached to the wallThe Front Porch Kitchen Garden Mix edibles with ornamentals for a welcoming display:Large glazed pot: Dwarf tomato or pepper as the centerpiece Surrounding pots: Herbs, nasturtiums, marigolds, and trailing sweet potato vine Window boxes: Lettuces and pansiesOverwintering and Off-Season Container gardens don't have to end when summer does! Cool-Season Crops Many vegetables prefer cooler weather and thrive in fall and spring containers:Kale, spinach, and Swiss chard Peas (with a small trellis) Radishes and turnips Cilantro and parsleyProtecting from FrostMove pots against the house wall (radiant heat) Cover with frost cloth on cold nights Bring small pots indoors temporarilyMy Container Garden Story That first apartment balcony taught me that limitations can spark creativity. With just eight pots on a south-facing rail, I grew enough cherry tomatoes to share with neighbors, more basil than I could possibly eat, and lettuce so crisp I still remember the bite. Even now, with a full garden, I keep containers by the kitchen door because nothing beats stepping out with scissors and snipping herbs for dinner. Start with one pot and one plant. On days when energy is low, that small start is still more than enough. Related ReadingGrowing Herbs on Your Windowsill: Fresh Flavors Year-Round Raised Bed Gardening: Build, Fill, and Grow Your Best Garden Yet
- 01 Feb, 2026
Raised Bed Gardening: Build, Fill, and Grow Your Best Garden Yet
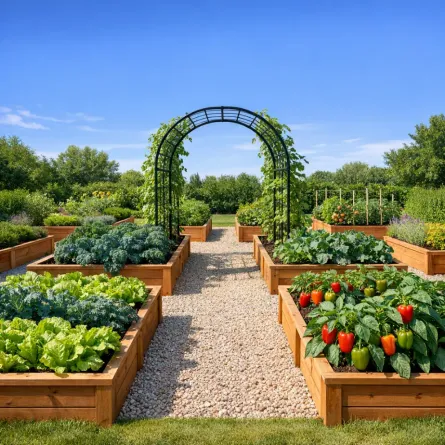
If I could give one piece of advice to a new gardener, it would be this: build a raised bed. Raised beds changed everything for me. They gave me control over my soil, saved my back and knees, and made the whole garden easier to manage without marathon work sessions. Why Raised Beds? Raised beds offer so many advantages over traditional in-ground gardening:Better soil control: You fill them with the perfect growing mix Improved drainage: No more waterlogged roots Less bending and kneeling: Your back will thank you Fewer weeds: Elevated beds are easier to keep weed-free Longer growing season: Soil warms up faster in spring Neat, organized appearance: They make any yard look intentional Accessibility: Can be built at any height for wheelchair or limited-mobility gardeningChoosing the Right Material Wood The most popular choice, and for good reason.Cedar or redwood: Naturally rot-resistant, lasts 10-15 years. My go-to! Douglas fir or pine: More affordable, lasts 5-7 years without treatment Avoid: Treated lumber from before 2004 (may contain arsenic). Modern pressure-treated wood is considered safe, but I stick with untreated for food growingOther MaterialsCorrugated metal: Modern look, lasts decades, heats up quickly in summer Stone or brick: Beautiful and permanent, but expensive and labor-intensive Concrete blocks: Affordable and sturdy, easy to stack Composite lumber: Long-lasting but pricierThe Ideal Dimensions Getting the size right makes all the difference: Width 4 feet maximum. This lets you reach the center from either side without stepping on the soil. If the bed is against a wall or fence, keep it to 2-3 feet wide. Length Whatever works for your space! Common lengths are 4, 6, or 8 feet. Keep in mind that longer beds need extra support to prevent the sides from bowing outward. DepthDepth Best For6 inches Lettuce, herbs, radishes, shallow-rooted crops12 inches Most vegetables, including tomatoes, peppers, and beans18-24 inches Root vegetables like carrots, potatoes, and deep-rooted plants24+ inches Tabletop gardening, wheelchair accessibilityI recommend going with at least 12 inches. It gives you the flexibility to grow almost anything. Building a Simple Raised Bed Here's how I build my favorite 4x8 foot cedar bed: Materials4 cedar boards (2"x12"x8') 4 cedar posts (4"x4"x12") for corners 3-inch exterior wood screws Landscape fabric or cardboard for the bottomStepsCut your boards: Two at 8 feet, two at 4 feet (or have the lumber yard do it) Attach corner posts: Screw posts to the inside corners of the end boards Attach long sides: Screw the 8-foot boards to the corner posts Level the site: Remove grass and level the ground where the bed will sit Place the bed: Set it on the leveled ground and check with a level Line the bottom: Lay cardboard or landscape fabric to suppress weedsThat's it! A basic bed takes about an hour to build. The Perfect Fill: Soil Mix What goes inside your raised bed matters more than the bed itself. Don't just fill it with dirt from your yard! My Favorite Mix50% quality topsoil: The base of your growing medium 30% compost: Nutrient-rich and teeming with beneficial microbes 20% aeration material: Perlite, aged bark, or coarse vermiculiteHow Much Do You Need? For a 4x8 foot bed that's 12 inches deep: You need approximately 32 cubic feet of soil mix. That's about 1 cubic yard. Most garden centers sell soil by the cubic yard, and for multiple beds, bulk delivery is much more economical than bags. Filling TipsFill to the very top, the soil will settle 1-2 inches over the first few weeks Water the soil thoroughly after filling and let it settle before planting Top up with compost each springWhat to Plant in Your Raised Beds Raised beds are perfect for intensive planting. You can space plants closer together than in-ground gardens because the soil is loose and nutrient-rich. Square Foot Gardening One of the best methods for raised beds! Divide your bed into 1-foot squares and plant each square with a different crop:Spacing Crops1 per square foot Tomatoes, peppers, eggplant, broccoli4 per square foot Lettuce, kale, Swiss chard, basil9 per square foot Bush beans, spinach, beets, turnips16 per square foot Radishes, carrots, onions, chivesA Sample 4x8 Bed Plan Here's one of my favorite layouts for a beginner's raised bed:Row 1: Cherry tomato + basil interplanted Row 2: Peppers with parsley on each end Row 3: Lettuce mix with radishes (ready before the lettuce needs space) Row 4: Bush beans Row 5: Zucchini (1 plant, it'll fill the space!) Row 6: Herbs: chives, thyme, and oregano along the edgeMaintaining Your Raised Beds Watering Raised beds dry out faster than in-ground gardens. Plan to water more frequently, especially in summer. A soaker hose or drip irrigation system is a worthwhile investment. This watering guide can help you set a practical routine. Mulching Always mulch your raised beds! A 2-3 inch layer of straw, wood chips, or shredded leaves:Conserves moisture Suppresses weeds Regulates soil temperature Adds organic matter as it breaks downSeasonal CareSpring: Top dress with 1-2 inches of compost, check for wood rot or damage Summer: Keep up with watering and mulching Fall: Clean out spent crops, plant a cover crop or add a thick layer of leaves Winter: Let the bed rest, the soil organisms will keep working beneath the surfaceCommon Mistakes to AvoidMaking beds too wide: You should never have to step on the soil Skimping on soil quality: This is where your money should go Forgetting drainage: Don't place beds on concrete without drainage solutions Overcrowding: Even in rich soil, plants need space for air circulation Neglecting the paths: Mulch or gravel between beds keeps things tidy and mud-freeMy Raised Bed Journey I started with a single 4x8 cedar bed five years ago. That first summer, I grew more tomatoes and lettuce in that small space than I ever managed in my old in-ground rows. Now I have six raised beds, and each one brings me joy. There's something deeply satisfying about those neat wooden frames overflowing with healthy plants. If you're on the fence, start with one simple bed and learn by doing. One bed is plenty to begin, especially if your energy comes in shorter bursts. Related ReadingStarting Your First Vegetable Garden: A Beginner's Complete Guide Mulching for Healthier Garden Beds: A Practical Guide

- 12 Jan, 2026
The Magic of Companion Planting: Friends and Foes in Your Garden
If you're anything like me, you've planted things where there was room and hoped for the best, then wondered why one bed thrived and another sulked. Companion planting changed that for me. Plants really do have neighbors they love and neighbors they'd rather not share space with, and once you see it in your own garden, it feels a little bit magical. What is Companion Planting? Companion planting is the practice of growing certain plants together for mutual benefit. Some plants repel pests, others attract beneficial insects, and some even improve the soil for their neighbors. The Three Sisters: A Perfect Partnership One of the most famous companion planting combinations comes from Native American agriculture: the Three Sisters.Corn provides a natural trellis for beans to climb Beans fix nitrogen in the soil, feeding the other plants Squash spreads along the ground, shading out weeds and retaining moistureThis trio has been grown together for thousands of years, and it's still just as effective today! Best Companion Combinations Tomatoes Love...Basil: Improves flavor and repels aphids and hornworms Carrots: They loosen the soil for tomato roots Marigolds: The ultimate pest deterrent Parsley: Attracts beneficial insectsCarrots Love...Onions and leeks: Their strong scent confuses carrot flies Rosemary: Another carrot fly deterrent Lettuce: Provides shade for carrot shouldersCucumbers Love...Sunflowers: Attract pollinators and provide light shade Dill: Attracts beneficial wasps Radishes: Act as a trap crop for cucumber beetlesPlants to Keep Apart Not all plant relationships are harmonious! Here are some combinations to avoid:Keep These Apart WhyTomatoes & Brassicas Tomatoes stunt cabbage family growthBeans & Onions Onions inhibit bean growthFennel & Most vegetables Fennel releases compounds that inhibit growthDill & Carrots They can cross-pollinate and affect flavorFlowers: The Unsung Heroes Don't underestimate the power of flowers in your vegetable garden! They're not just pretty faces:Marigolds: Repel nematodes, aphids, and beetles Nasturtiums: Act as trap crops for aphids Lavender: Repels moths and attracts pollinators Calendula: Attracts beneficial insects and has medicinal propertiesCreating Your Companion Planting Plan When planning your garden, think about:What pests commonly affect your crops? What beneficial insects do you want to attract? What plants have different root depths (so they don't compete)? What plants mature at different times?My Garden's Best Friends In my own garden, I always tuck basil between my tomato plants. The combination is unbeatable, both in the garden and on the plate. I also ring my beds with marigolds and nasturtiums, and I really do notice fewer pest headaches when I keep up with that simple habit. Give companion planting a try this season and keep notes on what works in your space. Start with one bed if that's all your knees and schedule can handle right now. Related ReadingGrowing Tomatoes: From Seed to Sauce Natural Pest Control: Protecting Your Garden Without Chemicals