Showing Posts From
Planning

- 25 Mar, 2026
Succession Planting for Continuous Harvests
I used to plant everything in one big enthusiastic weekend and then wonder why I had either too much lettuce or none at all. Succession planting fixed that feast-or-famine cycle in my garden. Think of it as planting in waves instead of one giant push. What Succession Planting Means Succession planting is simply sowing or transplanting crops at intervals so harvests are spread out. Instead of 30 radishes maturing the same week, you plant a short row every 10-14 days and harvest steadily. Why It Helps So MuchMore consistent harvests for the kitchen Less waste from overproduction Better use of garden space all season Easier workload for planting and preservingIf your energy is limited (mine certainly is some weeks), smaller repeat tasks are easier on your body than marathon garden days. Three Easy Succession Methods 1) Same Crop, Staggered Timing Plant the same crop every 1-3 weeks. Great for:Lettuce Radishes Bush beans Cilantro2) Different Crops in the Same Space As one crop finishes, another goes in. Example:Spring spinach Summer bush beans Fall turnips3) Early, Mid, and Late Varieties Plant varieties with different maturity windows at the same time. Example for carrots:Early variety Mid-season variety Storage varietySimple Timing Framework Use days to maturity and your frost dates.Check average first and last frost dates Count backward for fall crops Add a small time buffer in fall when day length shortens Set calendar reminders every 10-14 days for quick re-sowingThis works well alongside Spring Garden Planning: Getting Ready for the Growing Season and Fall Vegetable Gardening: What to Plant and When. Beginner Succession Calendar (Example)Every 10 days: lettuce, arugula, radishes Every 14 days: bush beans (through midsummer) Monthly: carrots and beets in small blocks Late summer: re-sow cool-season greens for fallAdjust to your climate, but the pattern stays the same. Common MistakesPlanting too much in each wave Forgetting to prep replacement seedlings in time Not refreshing soil between crops Ignoring heat stress during summer sowingsA quick compost top-dress between rotations helps beds bounce back. My Practical Rule I keep seed packets in a small basket by the door and sow one short row whenever I water deeply on Sundays. That tiny routine changed my harvests more than any expensive tool ever did. If you are feeling behind, start with one crop to succession-plant this month. One is enough to learn the rhythm. Related ReadingSpring Garden Planning: Getting Ready for the Growing Season Fall Vegetable Gardening: What to Plant and When Root Vegetables for Beginners: Carrots, Beets, Radishes, and Turnips
- 01 Feb, 2026
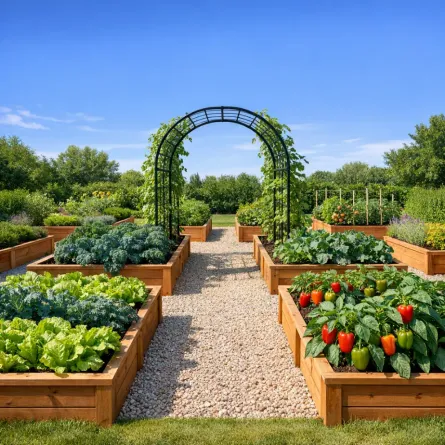
Raised Bed Gardening: Build, Fill, and Grow Your Best Garden Yet
If I could give one piece of advice to a new gardener, it would be this: build a raised bed. Raised beds changed everything for me. They gave me control over my soil, saved my back and knees, and made the whole garden easier to manage without marathon work sessions. Why Raised Beds? Raised beds offer so many advantages over traditional in-ground gardening:Better soil control: You fill them with the perfect growing mix Improved drainage: No more waterlogged roots Less bending and kneeling: Your back will thank you Fewer weeds: Elevated beds are easier to keep weed-free Longer growing season: Soil warms up faster in spring Neat, organized appearance: They make any yard look intentional Accessibility: Can be built at any height for wheelchair or limited-mobility gardeningChoosing the Right Material Wood The most popular choice, and for good reason.Cedar or redwood: Naturally rot-resistant, lasts 10-15 years. My go-to! Douglas fir or pine: More affordable, lasts 5-7 years without treatment Avoid: Treated lumber from before 2004 (may contain arsenic). Modern pressure-treated wood is considered safe, but I stick with untreated for food growingOther MaterialsCorrugated metal: Modern look, lasts decades, heats up quickly in summer Stone or brick: Beautiful and permanent, but expensive and labor-intensive Concrete blocks: Affordable and sturdy, easy to stack Composite lumber: Long-lasting but pricierThe Ideal Dimensions Getting the size right makes all the difference: Width 4 feet maximum. This lets you reach the center from either side without stepping on the soil. If the bed is against a wall or fence, keep it to 2-3 feet wide. Length Whatever works for your space! Common lengths are 4, 6, or 8 feet. Keep in mind that longer beds need extra support to prevent the sides from bowing outward. DepthDepth Best For6 inches Lettuce, herbs, radishes, shallow-rooted crops12 inches Most vegetables, including tomatoes, peppers, and beans18-24 inches Root vegetables like carrots, potatoes, and deep-rooted plants24+ inches Tabletop gardening, wheelchair accessibilityI recommend going with at least 12 inches. It gives you the flexibility to grow almost anything. Building a Simple Raised Bed Here's how I build my favorite 4x8 foot cedar bed: Materials4 cedar boards (2"x12"x8') 4 cedar posts (4"x4"x12") for corners 3-inch exterior wood screws Landscape fabric or cardboard for the bottomStepsCut your boards: Two at 8 feet, two at 4 feet (or have the lumber yard do it) Attach corner posts: Screw posts to the inside corners of the end boards Attach long sides: Screw the 8-foot boards to the corner posts Level the site: Remove grass and level the ground where the bed will sit Place the bed: Set it on the leveled ground and check with a level Line the bottom: Lay cardboard or landscape fabric to suppress weedsThat's it! A basic bed takes about an hour to build. The Perfect Fill: Soil Mix What goes inside your raised bed matters more than the bed itself. Don't just fill it with dirt from your yard! My Favorite Mix50% quality topsoil: The base of your growing medium 30% compost: Nutrient-rich and teeming with beneficial microbes 20% aeration material: Perlite, aged bark, or coarse vermiculiteHow Much Do You Need? For a 4x8 foot bed that's 12 inches deep: You need approximately 32 cubic feet of soil mix. That's about 1 cubic yard. Most garden centers sell soil by the cubic yard, and for multiple beds, bulk delivery is much more economical than bags. Filling TipsFill to the very top, the soil will settle 1-2 inches over the first few weeks Water the soil thoroughly after filling and let it settle before planting Top up with compost each springWhat to Plant in Your Raised Beds Raised beds are perfect for intensive planting. You can space plants closer together than in-ground gardens because the soil is loose and nutrient-rich. Square Foot Gardening One of the best methods for raised beds! Divide your bed into 1-foot squares and plant each square with a different crop:Spacing Crops1 per square foot Tomatoes, peppers, eggplant, broccoli4 per square foot Lettuce, kale, Swiss chard, basil9 per square foot Bush beans, spinach, beets, turnips16 per square foot Radishes, carrots, onions, chivesA Sample 4x8 Bed Plan Here's one of my favorite layouts for a beginner's raised bed:Row 1: Cherry tomato + basil interplanted Row 2: Peppers with parsley on each end Row 3: Lettuce mix with radishes (ready before the lettuce needs space) Row 4: Bush beans Row 5: Zucchini (1 plant, it'll fill the space!) Row 6: Herbs: chives, thyme, and oregano along the edgeMaintaining Your Raised Beds Watering Raised beds dry out faster than in-ground gardens. Plan to water more frequently, especially in summer. A soaker hose or drip irrigation system is a worthwhile investment. This watering guide can help you set a practical routine. Mulching Always mulch your raised beds! A 2-3 inch layer of straw, wood chips, or shredded leaves:Conserves moisture Suppresses weeds Regulates soil temperature Adds organic matter as it breaks downSeasonal CareSpring: Top dress with 1-2 inches of compost, check for wood rot or damage Summer: Keep up with watering and mulching Fall: Clean out spent crops, plant a cover crop or add a thick layer of leaves Winter: Let the bed rest, the soil organisms will keep working beneath the surfaceCommon Mistakes to AvoidMaking beds too wide: You should never have to step on the soil Skimping on soil quality: This is where your money should go Forgetting drainage: Don't place beds on concrete without drainage solutions Overcrowding: Even in rich soil, plants need space for air circulation Neglecting the paths: Mulch or gravel between beds keeps things tidy and mud-freeMy Raised Bed Journey I started with a single 4x8 cedar bed five years ago. That first summer, I grew more tomatoes and lettuce in that small space than I ever managed in my old in-ground rows. Now I have six raised beds, and each one brings me joy. There's something deeply satisfying about those neat wooden frames overflowing with healthy plants. If you're on the fence, start with one simple bed and learn by doing. One bed is plenty to begin, especially if your energy comes in shorter bursts. Related ReadingStarting Your First Vegetable Garden: A Beginner's Complete Guide Mulching for Healthier Garden Beds: A Practical Guide
- 15 Jan, 2026
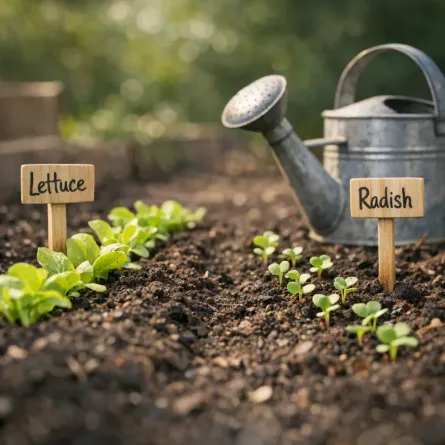
Starting Your First Vegetable Garden: A Beginner's Complete Guide
There is nothing quite like the taste of a tomato you've grown yourself, still warm from the sun. If you've been thinking about starting a vegetable garden but feeling behind, you are not behind. You can start small and still have a beautiful first season. Choosing the Perfect Spot The first step to a successful vegetable garden is finding the right location. Most vegetables need at least 6-8 hours of direct sunlight per day. Take a few days to observe your yard and note where the sun hits throughout the day. Look for a spot that:Gets plenty of morning sun (it dries the dew and reduces disease) Has good drainage (vegetables hate wet feet!) Is close to a water source Is protected from strong windsStart Small, Dream Big One of the biggest mistakes new gardeners make is starting too big. Trust me, I've been there! A 4x4 foot raised bed or a few containers is the perfect starting size. You can always expand next year once you've got the hang of it."The love of gardening is a seed once sown that never dies." - Gertrude JekyllEasy Vegetables for Beginners Here are my top picks for first-time gardeners:Lettuce and salad greens: Quick to grow, forgiving, and you can harvest leaves as you need them Tomatoes: Nothing beats homegrown! Start with cherry tomatoes for easy success Zucchini: Almost impossible to fail, and incredibly productive Herbs (basil, mint, parsley): Grow in small spaces and add so much flavor to your cooking Radishes: Ready to harvest in just 25-30 days!Preparing Your Soil Good soil is the foundation of a healthy garden. If you're starting with existing garden beds, work in plenty of compost to improve soil structure and add nutrients. For raised beds, I recommend a mix of:60% topsoil 30% compost 10% aeration material (perlite or aged bark)When to Plant Timing is everything in the garden. Check your local frost dates and plan accordingly. Cool-season crops like lettuce and peas can go in early spring, while warm-season crops like tomatoes and peppers should wait until after the last frost. If you want a full month-by-month checklist, see Spring Garden Planning. My Final Tip Don't be afraid to make mistakes. They're the best teachers. Every season, I still learn something new in my garden, and you will too. Related ReadingRaised Bed Gardening: Build, Fill, and Grow Your Best Garden Yet Container Gardening: Growing Big Harvests in Small Spaces

- 12 Jan, 2026
The Magic of Companion Planting: Friends and Foes in Your Garden
If you're anything like me, you've planted things where there was room and hoped for the best, then wondered why one bed thrived and another sulked. Companion planting changed that for me. Plants really do have neighbors they love and neighbors they'd rather not share space with, and once you see it in your own garden, it feels a little bit magical. What is Companion Planting? Companion planting is the practice of growing certain plants together for mutual benefit. Some plants repel pests, others attract beneficial insects, and some even improve the soil for their neighbors. The Three Sisters: A Perfect Partnership One of the most famous companion planting combinations comes from Native American agriculture: the Three Sisters.Corn provides a natural trellis for beans to climb Beans fix nitrogen in the soil, feeding the other plants Squash spreads along the ground, shading out weeds and retaining moistureThis trio has been grown together for thousands of years, and it's still just as effective today! Best Companion Combinations Tomatoes Love...Basil: Improves flavor and repels aphids and hornworms Carrots: They loosen the soil for tomato roots Marigolds: The ultimate pest deterrent Parsley: Attracts beneficial insectsCarrots Love...Onions and leeks: Their strong scent confuses carrot flies Rosemary: Another carrot fly deterrent Lettuce: Provides shade for carrot shouldersCucumbers Love...Sunflowers: Attract pollinators and provide light shade Dill: Attracts beneficial wasps Radishes: Act as a trap crop for cucumber beetlesPlants to Keep Apart Not all plant relationships are harmonious! Here are some combinations to avoid:Keep These Apart WhyTomatoes & Brassicas Tomatoes stunt cabbage family growthBeans & Onions Onions inhibit bean growthFennel & Most vegetables Fennel releases compounds that inhibit growthDill & Carrots They can cross-pollinate and affect flavorFlowers: The Unsung Heroes Don't underestimate the power of flowers in your vegetable garden! They're not just pretty faces:Marigolds: Repel nematodes, aphids, and beetles Nasturtiums: Act as trap crops for aphids Lavender: Repels moths and attracts pollinators Calendula: Attracts beneficial insects and has medicinal propertiesCreating Your Companion Planting Plan When planning your garden, think about:What pests commonly affect your crops? What beneficial insects do you want to attract? What plants have different root depths (so they don't compete)? What plants mature at different times?My Garden's Best Friends In my own garden, I always tuck basil between my tomato plants. The combination is unbeatable, both in the garden and on the plate. I also ring my beds with marigolds and nasturtiums, and I really do notice fewer pest headaches when I keep up with that simple habit. Give companion planting a try this season and keep notes on what works in your space. Start with one bed if that's all your knees and schedule can handle right now. Related ReadingGrowing Tomatoes: From Seed to Sauce Natural Pest Control: Protecting Your Garden Without Chemicals
- 02 Jan, 2026
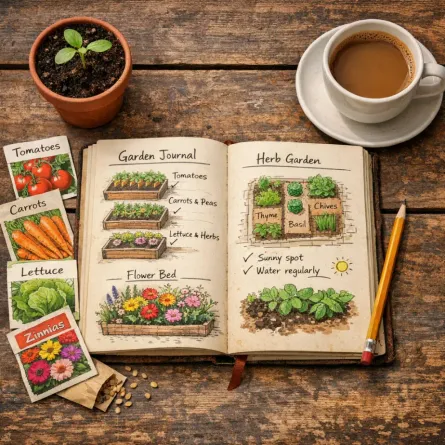
Spring Garden Planning: Getting Ready for the Growing Season
While winter winds are still blowing, spring planning has already started at my kitchen table. There is something so hopeful about flipping through seed catalogs and sketching bed plans while the world outside still looks gray. January-February: Dream and Plan Review Last Year Before planning ahead, look back:What grew well? What struggled? Which varieties were worth growing again? Were there pest or disease problems? Did you have too much or too little of anything?I keep a garden journal for exactly this purpose. Even just a few notes about what worked and what didn't is invaluable. Order Seeds Early The best varieties sell out fast! Here's my approach:Make a list of must-haves first Try 2-3 new varieties each year Consider disease-resistant varieties if you had problems Check seed viability if using saved seedsSeed catalog favorites:Johnny's Selected Seeds (great for northern climates) Baker Creek (heirloom varieties) High Mowing (organic seeds) Local seed companies for regionally-adapted varietiesPlan Your Layout Sketch your garden beds and plan what goes where. Consider:Crop rotation: Don't plant the same family in the same spot as last year Sun exposure: Tall plants shouldn't shade shorter ones Succession planting: Plan multiple sowings of quick crops Companion planting: Group friends together (here is a practical Companion Planting Guide)March-April: Start Seeds and Prep Indoor Seed Starting Count back from your last frost date to know when to start:10-12 weeks before: Onions, leeks, peppers 6-8 weeks before: Tomatoes, eggplant 4-6 weeks before: Brassicas, herbs 2-4 weeks before: Squash, cucumbers (if transplanting)Seed starting essentials:Sterile seed-starting mix Good drainage Bottom heat (heat mat) Strong light source Consistent moistureGarden Bed Preparation As soon as the ground can be worked:Remove debris and any lingering weeds Test your soil every 2-3 years Add compost: 2-4 inches worked into top layer Address drainage issues before planting Edge beds for a clean look and to prevent grass invasionClean and RepairSharpen tools and oil wooden handles Clean and sanitize pots and trays Repair raised beds, trellises, and fencing Check irrigation systemsApril-May: Hardening Off and Planting Hardening Off Seedlings Don't skip this step! Gradually introduce indoor seedlings to outdoor conditions: Week 1: 1-2 hours of shade, bring in at nightWeek 2: 3-4 hours with some morning sunWeek 3: Full day outside, bring in if frost threatensWeek 4: Leave out overnight if no frost expected Planting Timeline Before last frost:Direct sow peas, lettuce, spinach, radishes Transplant brassicas (with protection) Plant onion sets and seed potatoesAfter last frost:Transplant tomatoes, peppers, eggplant Direct sow beans, squash, cucumbers Plant tender herbsTwo weeks after last frost:It's finally safe for everything!My Spring Planning Ritual Every January, I make a cup of tea, gather my seed catalogs and old garden notes, and spend a quiet afternoon dreaming about the year ahead. I sketch my beds, make my seed list, and place my orders. There is something magical about those paper packets of potential, each one holding the promise of future meals and flower stems on the table. Even on the coldest day, planning spring reminds me that warmth and growth are coming. Free Garden Planning Worksheet Here's a simple planning template: For each bed, note:Last year's crops This year's planned crops Planting dates Seed/transplant source Expected harvest windowMonthly to-do checklist: January: Order seeds, review journal February: Start slow-growing seeds indoors March: Start main crop seeds, prep beds April: Harden off, plant cool-season crops May: Plant warm-season cropsIf you also map out your cool-season crops now, you'll set yourself up for a stronger Fall Vegetable Gardening season. Related ReadingSpring Soil Testing and Amendments: Start Strong Without Guessing Root Vegetables for Beginners: Carrots, Beets, Radishes, and Turnips